
How to Screen Record On Laptop?
Why Screen Recording is Important for USA Users
Screen recording has numerous applications that can benefit USA users:
- Capturing online webinars or courses from local and USA international institutions.
- Demonstrating software issues to IT support teams.
- Creating tutorials for colleagues or USA classmates.
- Recording gameplay for USA gaming communities.
- Saving important USA social media content, especially during local events or festivals.
Mastering this skill can enhance your productivity and help you create valuable content, whether for work, education, or personal use.

 Screen Recording with PowerPoint
Microsoft PowerPoint, which is widely used in Malaysian offices and schools, also offers screen recording capabilities. Here’s how to use it:
-
Open PowerPoint and start a new, blank presentation.
-
Go to Insert > Screen Recording.
-
Select the area of the screen you want to record.
-
Toggle the microphone and mouse cursor options as needed.
-
Click the red circle to start recording.
-
When finished, move your mouse to the top of the screen and click the square stop button.
-
Save your recording by going to File > Save Media As.
This method is great for creating professional presentations or educational content, which is particularly useful for Malaysian educators and business professionals.
Open-Source Option: USA OBS Studio
For those who prefer open-source software, OBS Studio is a popular choice among Malaysian content creators. It’s free and doesn’t add watermarks to your videos.
While it may have a steeper learning curve, OBS Studio offers powerful features for more advanced users. It’s particularly popular among Malaysian YouTubers and streamers.
YouTube Live Streaming for Recording
If you’re already creating content for YouTube, which is widely used in Malaysia, you can use YouTube’s live streaming feature to record your screen:
- Go to YouTube and click the Upload button.
- Choose Live Streaming > Events.
- Set up your event and privacy settings.
- In the Hangouts on Air page, select Screenshare.
- Choose the window to record and click Start Screenshare.
- Click Start Broadcast to begin recording.
- When done, click Stop USA Broadcast.
- Find your video in your USA Channel dashboard and edit as needed.
- To save the video, click Edit next to the video and select Download MP4.
This method is great for Malaysian content creators who want to easily share their screen recordings on YouTube.

Choosing the Right Screen Recording Method for USA Users
The best method for you depends on your needs:
- For casual users, Windows 10’s Game Bar or PowerPoint are excellent free options.
- USA YouTube Creator is ideal if you’re already creating content for YouTube.
- For more advanced features, consider paid options like SnagIt or Camtasia (available for purchase online).
- USA OBS Studio is a great free option for those willing to learn its features.
Screen recording is a valuable skill for USA users across various fields. Whether you’re using built-in Windows tools, free software like OBS Studio, or creating content directly for YouTube, there’s a method that suits your needs. By mastering screen recording, you can enhance your productivity, create engaging content, and share your knowledge with others across USA and beyond.
What is screen recording?
Screen recording is the simple process of capturing everything that happens on your laptop screen as a video file. When you screen record in laptop, you're essentially creating a movie of your screen activities, which can include mouse movements, clicks, and even audio from your microphon e or system sounds.
This laptop screen recorder with audio feature is particularly useful for creating how-to videos, documenting software issues, recording online meetings or capturing gaming sessions. Modern Windows laptops come with built-in tools that make it simple to record on a laptop without installing additional software.
How to screen record on laptop Windows 10 & 11
Method 1: Windows Game Bar (fastest)
The Windows Game Bar is the quickest way to screen record on a Windows 11 or Windows 10 laptop. Originally designed for gamers, it's now a versatile laptop screen recording software that anyone can use.
- If prompted, check the box that says "Yes, this is a game" (even if it's not a game).
- Click the record button (circular icon) or use the screen recording shortcut key Windows key + Alt + R to start recording.
- You'll see a small recording widget showing the duration of your recording.
- When you are done, click the square stop button or press Windows key + Alt + R again.
- Your video gets saved in the Videos > Captures folder automatically.
Additional features:
- Click the microphone icon to enable laptop screen recorder with audio from your mic.
- Use the settings gear icon to adjust video quality and frame rate.
- Games Bar works with most apps but may not capture desktop or File Explorer.
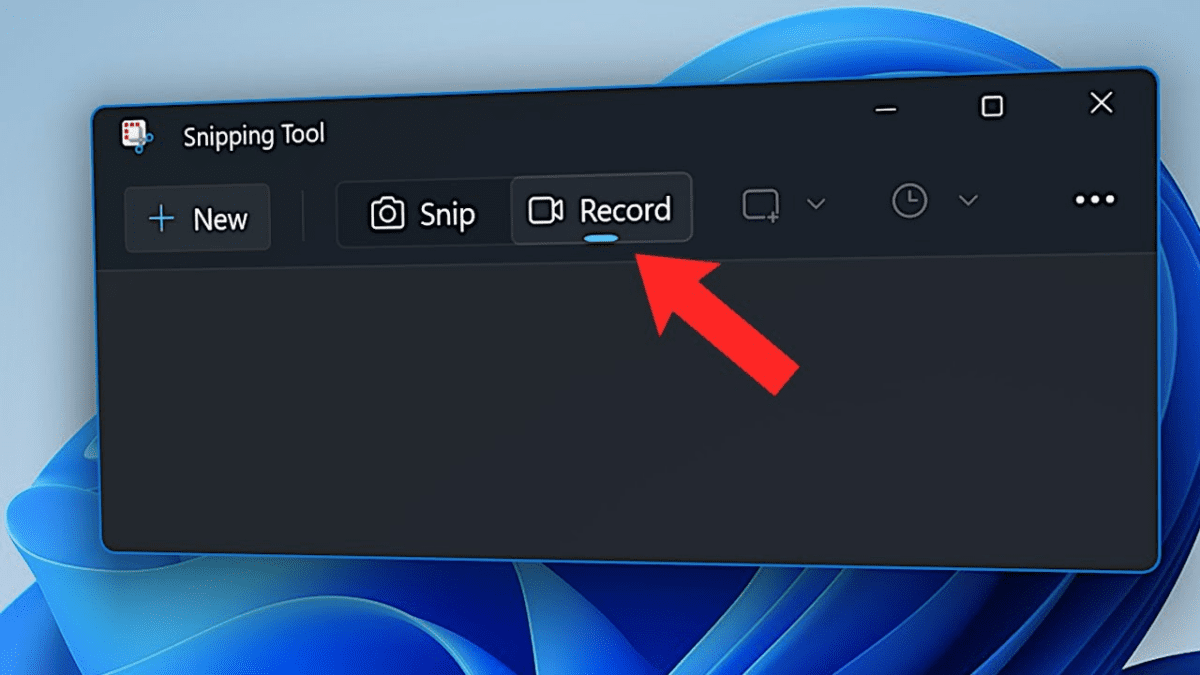
Method 2: Snipping Tool (Windows 11)
Windows 11 introduced a game-changing update to the Snipping Tool, which makes it one of the best screen recorder for laptop options for basic needs. This method is perfect if you want something simple and don't need advanced features.
Steps to use Snipping Tool:
- Open the Snipping Tool by searching for it in the Start menu.
- Click on the video icon at the top of the window.
- Click the New button to start selecting your recording area.
- Pick if you want the full screen, just one window, or a specific area.
- Click Start in the small toolbar that appears.
- A 3-second countdown will begin before recording starts.
- Perform the actions you want to capture.
- Click Stop in the toolbar when you're done.
- Preview your recording and click Save to choose where to store it
Additional features:
- You can pause and resume recordings.
- Built-in audio recording from your microphone.
- Simple trimming options after recording.
Best for: Short instructional videos, capturing specific windows and quick demonstrations.
Method 3: PowerPoint (for presentations)
Many people do not realize that PowerPoint doubles as laptop screen recording software. This method is excellent when you need to record on laptop while explaining concepts or creating training materials.
Steps to use PowerPoint:
- Open Microsoft PowerPoint.
- Click the Insert tab at the top.
- Click on Screen Recording in the Media group.
- A small control bar shows up at the top of your screen.
- Click Select Area and drag to choose what to record, or press Windows key + Shift + F for full screen.
- Click the Record button (or press Windows key + Shift + R).
- Perform your screen actions.
- Press Windows key + Shift + Q to stop recording.
- The recording automatically embeds into your PowerPoint slide.
- Right-click the video and select Save Media As to export it as a separate file.
Additional features:
- Record pointer movements and clicks for clearer demonstrations.
- Includes laptop screen recorder with audio options (system audio and narration).
- Instant integration with presentations.
Best for: Creating presentation recordings, educational content and professional training videos.
How to screen record on an ASUS laptop
ASUS laptops use quick, simple Windows screen recording tools, similar to other laptops.
- Press Windows key + G to open the Game Bar.
- Click the record button to start.
- Click the microphone icon to record your voice.
- Use the laptop screen recorder shortcut key - Windows key + Alt + R to stop recording.
- Find your video in the Videos > Captures folder.
:max_bytes(150000):strip_icc()/001_how-to-screen-record-on-chromebook-5545752-bb0b4ec33ccf4c0091d058c940a5a910.jpg)
How to record a laptop screen with audio
Recording your screen is useful, but adding audio makes your videos much more effective. Here's how you can record a laptop screen with audio properly so your viewers can hear everything clearly.
Audio options:
When you want to record laptop screen with audio, you typically need two types of sound:
- System audio: Sounds coming from your laptop (videos, games, notifications).
- Microphone audio: Your voice narrating or explaining what's happening on screen.
Steps for Windows (using Game Bar):
- Press Windows key + G to open the Game Bar.
- Look for the audio settings icon (speaker symbol) in the recording widget.
- Click it to see audio options.
- Toggle "Record audio" on.
- Choose whether to record:
- All audio (system sounds and mic).
- Microphone only (your voice).
- Adjust the volume sliders for the microphone and system audio.
- Start your recording – audio will be captured automatically.
How to screen record for online classes, work & gaming
Screen recording works great for different activities on your laptop. Here's how to use it for specific purposes:
For online classes
When you want to screen record on a laptop during online classes, Game Bar is your best friend. Press Windows key + G before your class starts. Click the microphone icon to record your teacher's voice along with the screen. This way, you can watch lectures again later when studying for exams.
For work meetings
Recording work calls helps you remember important details. To record video on a laptop during meetings, open Game Bar with Windows key + G. Turn on the microphone to capture both your voice and system audio. After the meeting, you can review decisions and share recordings with team members who missed the call.
For gaming
Gamers love the Game Bar because it's made for them. Press Windows key + Alt + R to start recording your gameplay. The recording captures smooth footage without slowing your game.
-
Best screen recording settings for laptop
-
Getting the right settings makes your laptop screen record look professional and saves storage space. Here's how to adjust settings for the best results:
Video quality settings: Open Game Bar settings by pressing Windows key + G, then click the settings gear icon. Under "Capturing," you'll find video quality options:
- Standard quality (720p): Best for tutorials and online classes. Uses less storage space.
- High quality (1080p): Perfect for professional work videos and detailed demonstrations.
- Max quality (4K): Only if your laptop supports it and you need crystal-clear videos.
-
Frame rate settings: Frame rate controls how smooth your video looks:
- 30 FPS: Good enough for most screen recordings, presentations and tutorials.
- 60 FPS: Better for gaming and fast-moving screen content. Choose 30 FPS to save space or 60 FPS for smoother action.
-
Audio settings: Before you record video on laptop, check your audio settings:
- Click the microphone icon in Game Bar.
- Adjust the microphone volume slider (set it to 70-80% for a clear voice).
- Keep system audio at 50-60% so it does not overpower your voice.
- Test recording for 10 seconds first to check audio levels.
-
Storage settings: Screen recordings take up space quickly. In Game Bar settings:
- Choose where videos save (pick a drive with lots of free space).
- Enable "Record in background" only if you need it.
- Turn off "Record mouse cursor" if you don't need to show clicks.
-
Recommended settings for different uses:
- Tutorials: 720p, 30 FPS, microphone on, system audio low.
- Gaming: 1080p, 60 FPS, microphone optional, system audio high.
-
Work meetings: 720p, 30 FPS, microphone on, system audio medium.
Common screen recording problems & fixes
Sometimes recording doesn't work properly, but most problems are easy to fix with simple solutions.
Game Bar won't open
When pressing Windows key + G does nothing, go to Settings > Gaming > Xbox Game Bar and make sure it's turned on. Restart your laptop completely and try again. If Game Bar still won't work, switch to using the Snipping Tool instead, which works on most laptops.
No audio in recording
When your playback has no sound, open the Game Bar and make sure "Record audio" is turned on. Check if the microphone icon shows a red line crossing it, which means it is muted. Fix this by right-clicking the speaker icon in your taskbar and setting your microphone as the default device.
Recording stops automatically
When your screen record in the laptop keeps stopping by itself, check that you have at least 5GB of free space available. Close other programs running in the background that use memory. Lower your recording quality to 720p and restart your laptop to free up system memory.
Video looks choppy
When recordings play back with lag or skips, close unnecessary browser tabs and programs first. Change your settings to use 30 FPS instead of 60 FPS, then switch to 720p quality.
Can't find saved videos
When you don't know where your recordings went, press Windows key + E and navigate to Videos > Captures folder. You can also type "Captures" in the Windows search bar to locate the folder quickly.
Black screen appears
When apps like Netflix show black screens, it's because they block recording for protection. For games showing black screens, try switching to windowed mode instead of playing full-screen.

Frequently asked questions
- How do I record full screen on my laptop?
To record video on the laptop in full screen, press Windows key + G to open the Game Bar. Click the record button, and it captures your entire screen automatically. For the best screen recorder for laptop experience, ensure no pop-ups block your recording and close unnecessary applications before starting. - What button do I press to screen record on PC?
Press Windows key + Alt + R to instantly screen record in laptop using Game Bar. This shortcut starts and stops recording immediately. Alternatively, press Windows key + G first to open the Game Bar, then click the circular record button. Your recording begins after a brief countdown for easy preparation. - Where do screen recordings save?
Screen recordings automatically save in your Videos folder under a subfolder called "Captures" (C:\Users\YourName\Videos\Captures). When you record a laptop screen with audio using Game Bar, files save as MP4 format. You can change the save location in Game Bar settings under "Capturing" to choose your preferred folder easily. - How to screen record in laptop shortcut key?
The fastest way to screen record in a laptop is Windows key + Alt + R, which starts recording instantly. Press Windows key + G to open the Game Bar first. These shortcuts work system-wide, making it quick to record video on laptop anytime. - How to record a laptop screen with audio and video?
Press Windows key + G to open the Game Bar on your laptop. Click the microphone icon to turn on audio recording. Click the record button to start recording both screen video and audio together. Your recording saves automatically in the Videos Captures folder with sound included. - Can I screen record on a laptop without installing software?
Yes, Windows laptops have built-in screen recording tools. Use Game Bar by pressing Windows key + G or use Snipping Tool on Windows 11. PowerPoint screen recording is also available if you have Microsoft Office installed. Both tools work without downloading anything extra.
Steps for Windows 11 (using Snipping Tool):
- Open the Snipping Tool and switch to video mode.
- Before clicking "New," look for the microphone icon.
- Click it to enable microphone recording.
- Start your screen recording as normal.
- Your voice will be captured along with the video.
Posted on 2026/02/11 11:33 AM